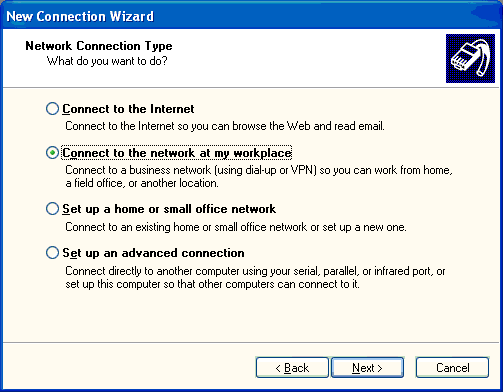
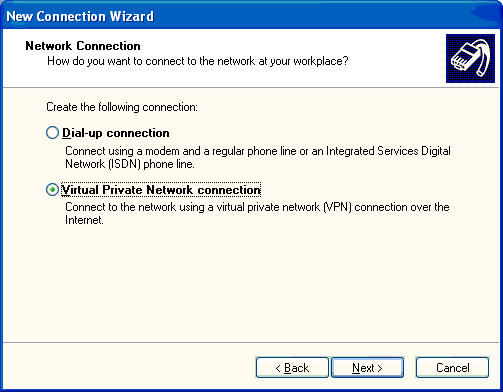
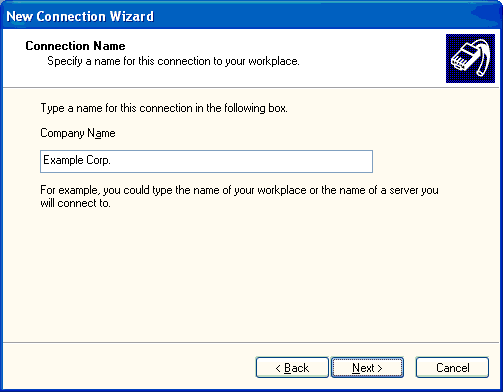
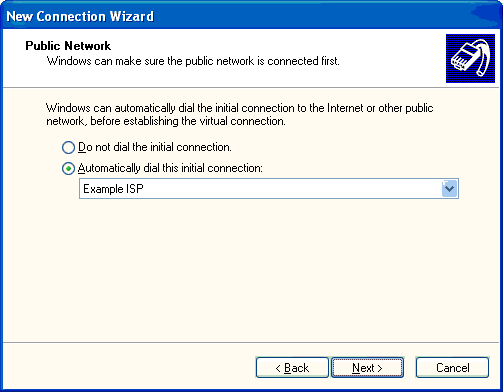
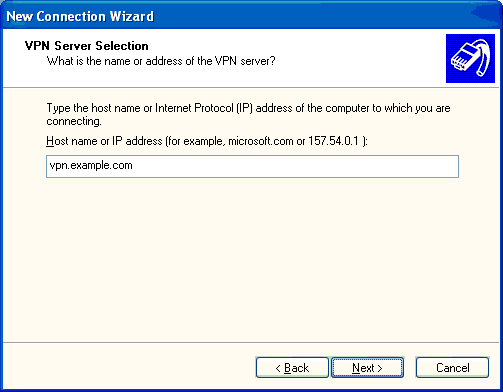
Set up a VPN Gaming Tunnel for Windows 2003 Server, and Windows XP clientsThis is by no means a fun or easy process. It is long, involved, and involves some high level network components, knowledge of active directory, DNS, Wins, and some other crap. Unless you really know your stuff, or are a crazy masochist I wouldn't suggest doing this. I am going to just talk about the steps, and what needs to be done. I will try and give a pretty good step by step, but I am not going to completely hold your hand on this one. If you are trying a project that is this in depth (and you have the stuff to even do it in the first place) you better be willing to learn a little on your own, and know how to adapt things to your needs. I don't mean to sound like a jerk, but there is just no way I can't account for every type of setup there is out there. Once you get it up and running, it works awesome and does exactly what it should. It will work for any application or game where you can specify the IP to connect to, since broadcast packets do not transverse the server. If you can find some way to make broadcast packets go across the VPN then it would be completely functional for everything. This works for most things. You may need to adjust the following steps to fit your current situation. All settings I describe may not be totally needed, but they are what worked for me. Feel free to tweak it to your needs or liking. 1) Gather the Names of any computer that will VPN inYou can add more computers and users later, but knowing the info for the initial ones right off the bat will be useful. For this tutorial I will call my VPN client "COMPA". Anyone who wants to VPN in will also need a username and password to login to your machine. We will add that later. 2) Install RASWe need to install Routing and Remote access server so that your server will listen for incoming connections and allow them to connect to your network. This service is the backbone of the whole VPN deal. It is imperative that this goes off without a hitch. Start -> Manage Server -> Add or remove a server role ->next-> Remote Access / VPN Server->next-> Configure to your needs, but make sure to tell it VPN. Start -> Administrative Tools -> Routing and Remote Access Right click on "Server Status" and click add server. "This Computer" Radio button should be checked. Right click on the properties of the server. Make sure "Router" is checked, and the "LAN and demand-dial routing" is selected. Check the box that says "Remote Access Server". Click on the IP tab, make sure there are checks in the following boxes: "Enable IP Routing", "Allow IP-based remote access and demand dial connections", "Enable broadcast name resolution. Make sure the DHCP radio button is selected. Now go to the PPP tab. All buttons on this page should be selected. Close the properties box. To clean up a little bit, you want to click on "Ports" in the Routing and Remote Access pane. Then reduce the number of PPP connections to just how many you will need. Then set L2TP to none. 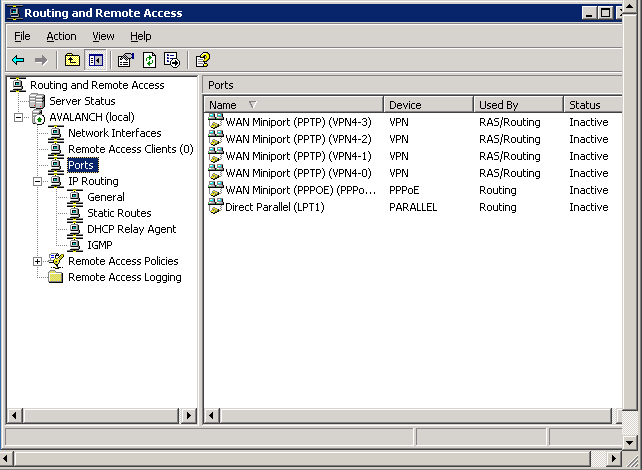 That should be all you have to do for this section. Let's move on. 3) Create and configure usersOnce a client is configured to connect, they are going to need a username and password. Of course since this is a domain style environment (at least mine is) the user is going to need a username and password in Active Directory. That user will also need the appropriate permissions and settings to connect to your VPN. With the method I am describing, it assumes the same person will always log in on the same computer. You will see why later, but for now lets just create some users shall we? Start -> Administrative Tools -> Active Directory users and computers -> Your domain -> users Right click in an empty space in the Users pane on the right. Select new->user 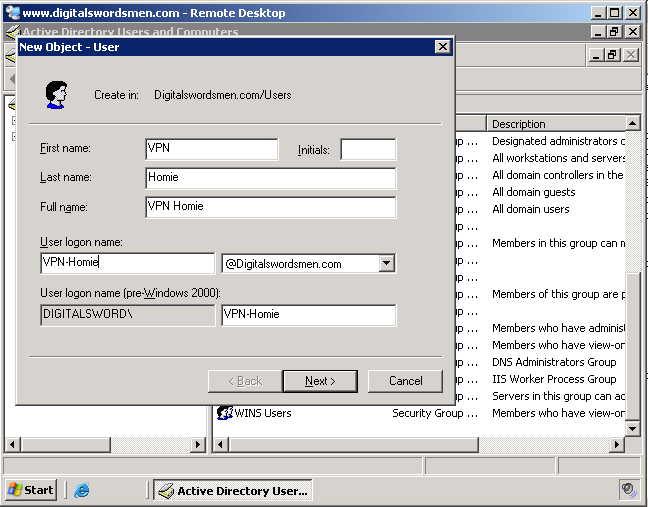 Fill in the data appropriately. I will call my user VPN-Homie. Give them a password and all that good stuff. Once created right click on them and go to properties. Click the "Dial-In" tab. Select the "Allow Access" radio button. Then go down to "Assign Static IP Address". Give this computer some IP address that is in your network, and preferably outside of the scope of your DHCP server. 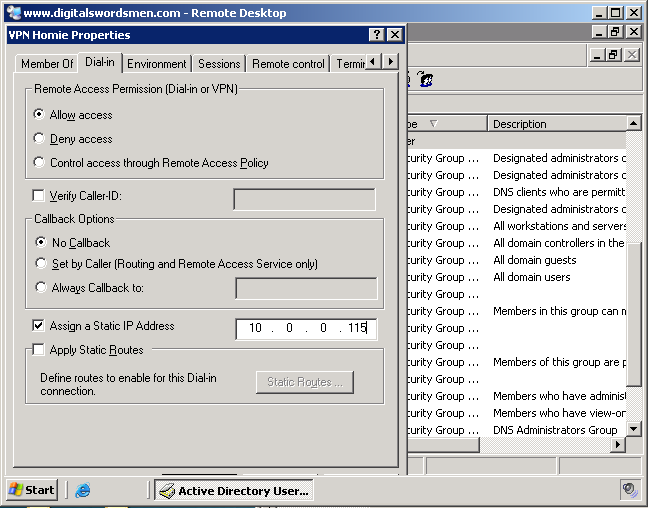 My network is 10.0.0.X where X is a host. My DCHP server gives out IP's from 10.0.0.100 to 10.0.0.110 So I gave my VPN-Homie 10.0.0.115. That should be all you need to do for that user. Go ahead and close that page. Repeat these steps for any other users you may need to create. 4) Install WINS on the ServerWINS is the old ghetto style Windows excuse for DNS. It bound names to IP addresses, and allowed you to address network computers by their name. It is very simple, and still somewhat handy to have around. VPN is really weird about name resolution, and in theory you shouldn't really need WINS server installed, but we should give this thing every chance to succeed don't you think? So anywho lets get WINS installed and configured. Start -> Manage Server -> Add or remove a server role ->next-> WINS server->next-> I don't remember the exact steps from there, but it is pretty easy I'm sure. There isn't a whole lot to WINS. Start -> Administrative Tools -> WINS -> Your server -> active registrations Right click on active registrations and click "Display Records", click "Find Now" You may or may not see some entries. Not a big deal either way. What we have to do now is add static WINS entries to your VPN clients. Right click active registrations and click "New Static Mapping". The computer name is of course the name of the computer that is going to connect. For this example, like stated earlier the name of the computer connecting is COMPA (You will probably want to get this info from the friend who is connection. The computer name can be found in the system applet in the control panel under the Network Name tab. 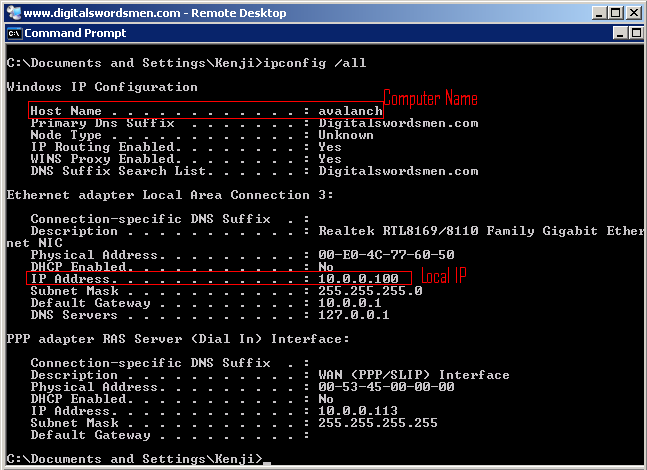 The computer name can be found there to). The Netbios scope leave blank, and the type leave default. 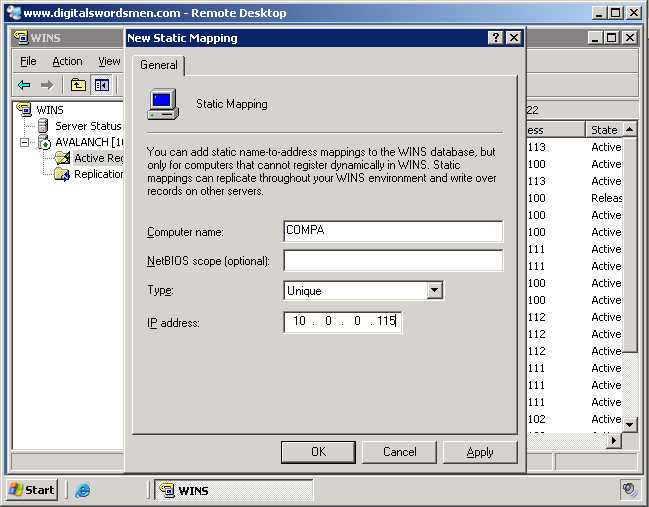 Now for IP address enter the IP that you gave the user that will use that computer. My user VPN-Homie, was assigned IP address 10.0.0.115 in his profile. He uses computer "COMPA". So for COMPA I put the address I assigned him, which was 10.0.0.115. If you haven't seen it now, I will explain why it is such a big deal that the same person uses the same computer. Imagine is VPN-Homie went and used a different computer, say it was called COMPB. When VPN-Homie logs in COMPB is now going to get the 10.0.0.115 address assigned to it. But WINS knows that the address 10.0.0.115 belongs to COMPA. So when someone tries to ping COMPB, there is no record for it, so the ping fails. If someone tries to ping COMPA the server will locate COMPA at the address, but since COMPB is registered to it, the ping may succeed but for the wrong host. You get connections failing that should work, and ones working that should fail. This is all in theory though. I have not tested to see what the results would be of a person using a different machine than they normally do. I would think though that it would cause a lot of problems. So in short, unless you feel like experimenting, make sure the same users use the same computers to VPN in all the time. Otherwise who knows what may happen! 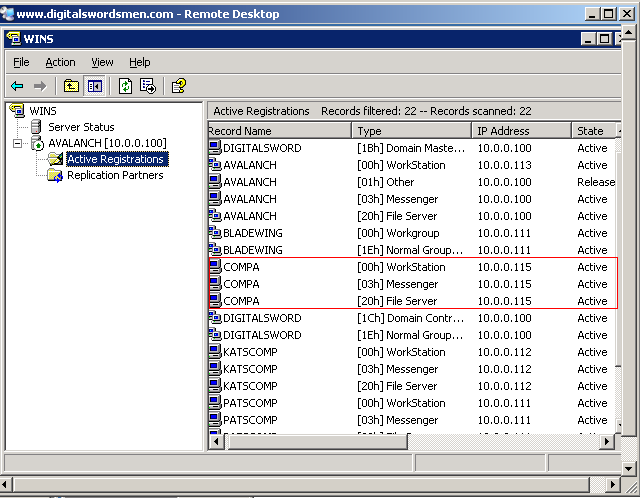 Once that static mapping has been made, 3 WINS records should show up for the computer. That is it for WINS. Repeat those steps for any other computers you need to configure for. We just have to configure DNS and we are done with server side crap! 5) Create DNS Records in the server for the VPN clientsDNS is the glorious service that is used nowadays to BIND names to IP addresses. It is the newer better WINS, although it is a F**kload more complex. Thank god we don't need to do too much. Just add a few host records. Start -> Administrative Tools -> DNS -> Your server -> forward lookup zones -> your domain Right click a blank area and click "New Host (A)". This is going to add an A record which is just a record that points to a host machine. For name, put the name of the computer. For the IP put the one assigned to that computer. Again, for me it is COMPA, 10.0.0.115, and check both boxes below. Repeat those steps for any other computers you need to configure for. 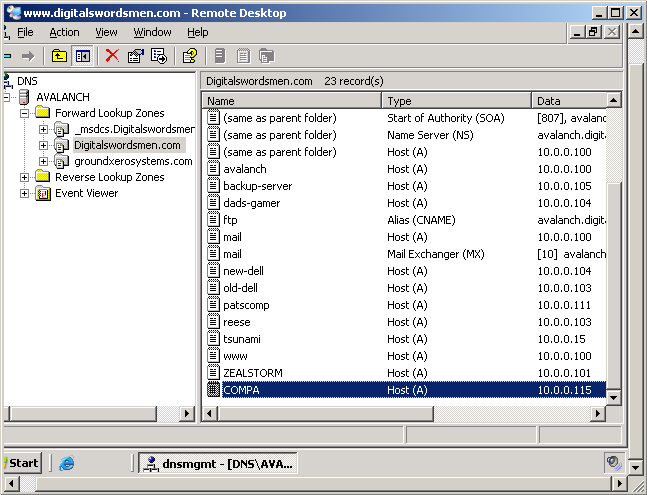 6) Forward incoming VPN connection requests to the server in the routerOnce someone asks to connect to your VPN the request is first going to hit your router, the router needs to know what it is going to do when it sees a request for VPN. We are going to tell it to forward the request to your RAS server. You should know how to connect to your router. If you don't, and you have one of those crappy home (belkin/linksys/netgear) routers (like I do) you can usually connect to the web interface by going to one of the following IP addresses in your browser. http://192.168.0.1 http://192.168.1.1 http://192.168.2.1 The easiest way to find were your router is at (provided you actually have one, and your network is configured like a normal one) is to find your default gateway. That is again in the command prompt, enter the command "ipconfig /all" and whatever the default gateway is, is your router. Once you find and access your router, move to the next step. Connect to your router and forward whatever port you are using for VPN to your server. You should be able to do this in Virtual Servers/Port forwarding/ Applications and Gaming. If you are using PPTP VPN (The most common type) 1723 is the port. Save the settings. Set it to forward it to whatever the Local IP of your RAS server is. If you don't know how to find that& how did you get this far? 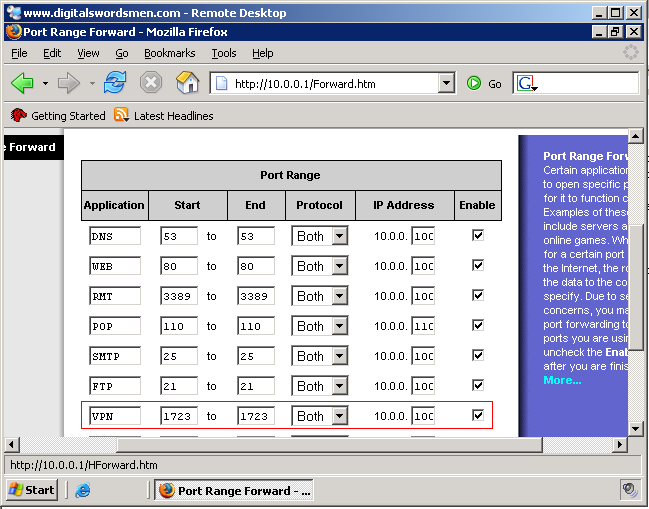 Some routers (linksys) under the security tab have something called VPN pass through. I believe by default this is enabled. You may want to double check and make sure PPTP VPN pass through is enabled. 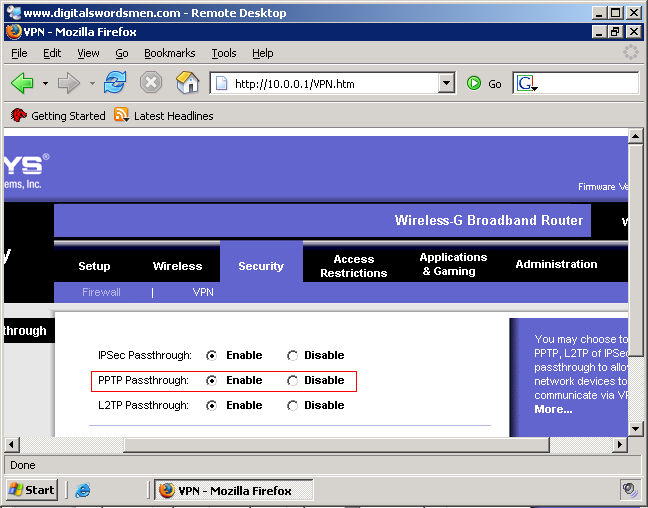 Alright there you have it. The server side work is all done. You may want to go back and add extra security and such later. But for right now, lets just get a client set up to connect. Security should always be done after connectivity is first established. 7) Set up Windows XP VPN Client ConnectionThere is a really good article about creating a connection about how to set up the client located at. http://www.microsoft.com/windowsxp/using/mobility/expert/vpns.mspx Incase that link doesn't work here are the instructions. THE FOLLOWING IS TAKEN FROM THE MICROSOFT.COM WEBSITE AND WAS NOT WRITTEN BY ME. THIS IS A REPRINT OF THE DIRECTIONS FROM THE LINK LISTED ABOVE. Microsoft.com Content BelowTo make a VPN connection
End Microsoft.com content(Microsoft Content will be taken down upon request of Microsoft. E-mail me at Aoshi775@hotpop.com) There you have it, thanks MS. Of course the username and password used by the person will be whatever you set them up with at the beginning. Now lets put this sucker to use. Have your friend VPN in. If all goes well it should log them in. You can test basic connectivity with PING by name, and IP address. Hopefully that all goes well. You should be able to shared files also like you were on a LAN if you have shares available on your drives. Of course, the reason we set this up is to play LAN games! Remember, any game that uses broadcasts to find other players will not work without additional modification that I haven't figured out how to do yet. Broadcasts are packets sent out by a computer that is mean to go to every other computer on a network. For games they are usually saying that a game can be located at their IP address. However, routers block broadcast packets to save on network overhead. They create broadcast, and collision domains. The VPN server is acting as a router, and therefore blocking broadcast traffic. Don't worry though, most games allow you to type in an IP address of a computer you wish to connect to. Usually it works best if a computer on the VPN server network hosts the game. Then the VPN client can simply enter the IP of the computer that is hosting the game and it should connect. Remember to turn off any firewalls you might have, because that could kill connectivity. That's it! You're done. With any luck everything went smoothly and it works now. Odds are it didn't. Just keep troubleshooting and trying to find out WHY something is happening, don't just look for a fix. Read other articles on-line concerning VPN, and re-read this one to make sure you did everything right. Once you get it up, it is fantastic. You can play games with whole parties of friends when they are at their homes, and you don't need to deal with slow crappy internet servers filled with script kiddies and n00bz. Now if you will excuse me, my friends and I are going to play some UT 2004 over VPN now! Written by: Daniel Llewellyn E-mail: Aoshi775@hotpop.com
|
You must be logged in to vote! | ||||||
|
|
|||||||